It might be snowing here at House Number 3 today, but the calendar still says it's fall. I thought I'd share something small today. If you're looking to add a touch of whimsey to your fall decor, here's one idea:
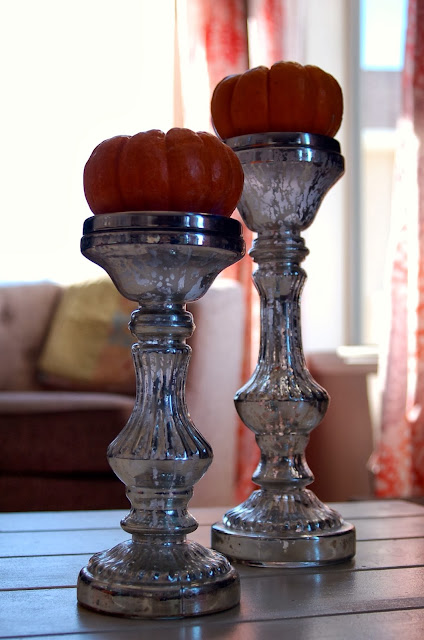
Aimee (Amos, as I call her) came up from Arizona a while back, and brought me these darling mercury glass pillar holders. She knows I like sparkly things! I didn't have any pillar candles on hand, and I didn't want to wait to get some before I used these darling candle holders. I did happen to have a few mini pumpkins sitting in my kitchen, so vóila, problem solved!
I think they're cute and whimsical, and definitely something a little different.
I even added a short one to the mantel.
I love finding new and unique uses for different objects. Besides that, it was simple! And now that it's snowing, their cheerful color adds some contrast to all that white stuff outside!
Saturday, November 16, 2013
Monday, November 11, 2013
Thanksgiving Dining Room
Hey Friends! The last few days here in the mountaintops have been absolutely spectacular. It has been sunny and cool, with temps reaching about sixty. In November, we'll take it! In fact, as I look out the window right now, the park is full of people out enjoying the weather. And, as I typed that sentence, my son hit the front door with his Frisbee! Life is good up in here!
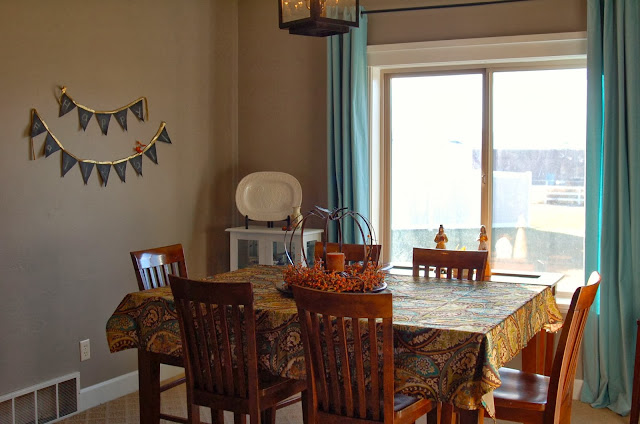
I decorated my dining room for Thanksgiving the other day. I've never had a house with a formal dining room before, so I was very excited to make it pretty for fall! The only thing missing is a rug, but that is something that will come later. For now, I'm pretty happy with how it turned out!
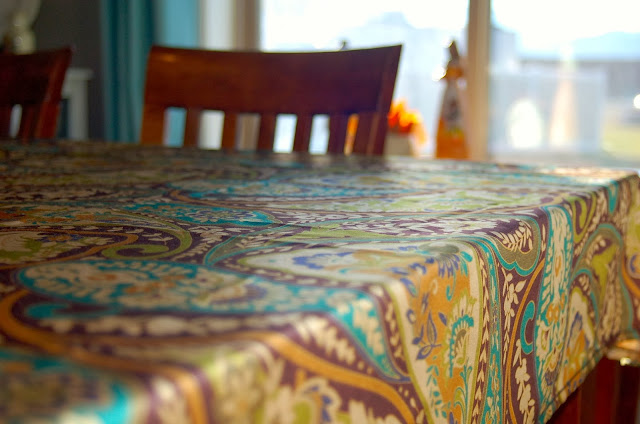
The first thing I did was to sew myself up a new tablecloth. I am so in love with shades of aqua and turquoise recently. I just love how the fabric plays off of the curtain colors, too. Isn't it pretty? I picked up the fabric from a red-tag bolt at JoAnn Fabrics. I don't think I paid more than 7 or 8 dollars for it. I pressed the ends and hemmed around the edges with a zig-zag stitch.
I've had this metal pumpkin for YEARS. Years, I tell you. I think I bought it for House Number One. Every Fall, I take it out of storage, and it ends up somewhere different every time. I decided it would make a pretty centerpiece this year, and so there it sits, atop the Lazy Susan.
This little vignette sits on top of the little cabinet where I keep my collection of Delft Blue pieces. (I'll talk about that another day). The platter came from one of my favorite places for home decor here in Utah: Tai Pan Trading. They have everything there you can imagine, and the platter was only $5.00! If you don't live in Utah, I know I've seen similar platters at WalMart. The little vase is something my husband picked up in Japan when he was a young Mormon missionary there. He brought it home and gave it to his grandmother. When she died, the vase came home to us.
Here are the little pilgrims and turkey standing guard at the side table.
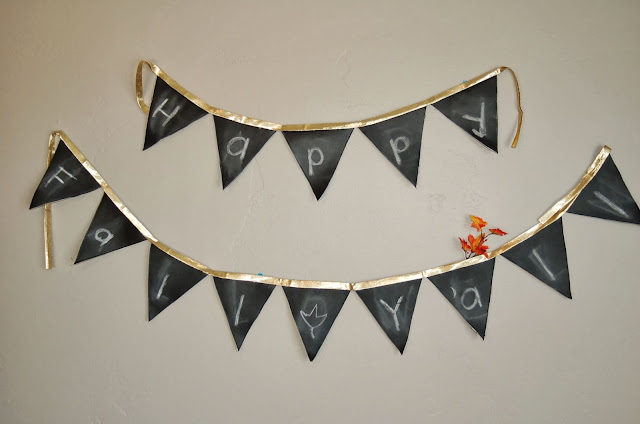
I made this cute banner from a tutorial I found on Pinterest. I'll save that for another post, though. It's made from Chalk Cloth by Moda. I love that you can use it over and over again. All you need is chalk! The "Happy Fall Y'All" is an homage to our friends and family back in Texas.
Here it is, hanging on my mantel last month.
I'm so excited about Thanksgiving. It's a time to express gratitude for everything I have. I hope that I can remember to express those feelings throughout the year, and not just in November. This year I'm especially grateful for a beautiful new home!
Happy Fall, Y'All.
Monday, October 28, 2013
Happy Fall, Y'All!
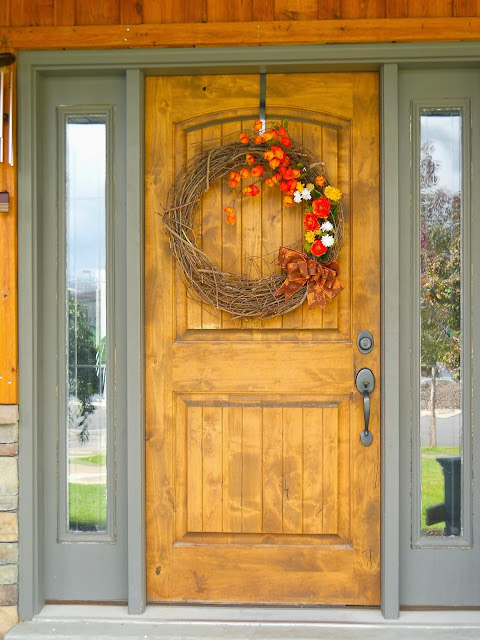
Fall is here, and I have to say it's my second-favorite season, behind summer. And it's a distant second. However, I do love the vibrant hues of orange and red and yellow. This year, I decided to make a new fall wreath for my front door. The flowers on the old wreath? Not so vibrant anymore. I took them off the old grapevine wreath and replaced them with some pretty new ones from JoAnn. I think they add a nice splash of color against my mostly brown house. I chose ranunculus, pom-pom chrysanthamums, and lantern blossoms. They're all wrapped up with a sparkly new bow.
What do you think?
Making a wreath can be as simple or as intricate as you want it to be. I ALWAYS opt for simple. Less is more, wouldn't you say? For this wreath, I "mapped" out where I wanted the flowers to go. Then I simply used wire cutters to cut the flowers down to the desired length. Then I stuck 'em in, wedging them between the twigs of the grapevine. Finally, I made the bow and used a twist tie from a bread sack to attach it to the wreath. Easy Peasy! The wind has been blowing all day today, and to quote Bill Murray in Ghostbusters, "The flowers are still standing!"
Happy Fall, Y'All!
Friday, September 27, 2013
Spring Rolls with Thai Nut Sauce
In case you've wondered I've been recently, and why my posts have been, well, non-existent, it's because I took on a temporary teaching job for the 1st term of school. So everything else (well almost everything else) here at House No. 3 has been put on hold.
Last weekend, we painted our master bathroom and closet. I forgot to take some "before" pictures, but I took some "during" shots, and as soon as it's all put back together, I'll have some "after" pictures. But like I said, things have slowed waaaaay down with a full-time teaching job. At least until November.
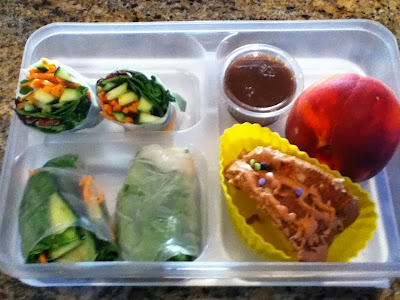
But in the meantime, I've packed my own lunch to school every day, so I thought I'd share a sample of something I made the other day and give you the recipe. I have been making spring rolls all summer long. I love how crunchy and fresh they are. And the dipping sauce is divine. And every year, I love the peaches that come up during late summer/early fall. I learned this week that 50% of my family hates peaches! I was shocked. Who doesn't love that fuzzy sweetness? And speaking of sweetness, I just had to take a yummy piece of caramel apple cake, left over from our Sunday dinner.
Spring rolls are really simple to make. If you can wrap a burrito, you can wrap a spring roll! All you need are some spring roll wraps (found in the Asian section of the grocery store) and whatever veggies you have on hand. I had a package of spring mix, some romaine lettuce, cucumbers, and shredded carrots. I've also used purple cabbage and avocados. The spring roll wraps I use are hard like pasta. After soaking one in a bowl of water for a minute, it softens up. I lay all my veggies at the bottom of it and roll it up. It will stick to itself -- a self-sealing container! Then I cut them in half because A) they look prettier that way and B) they won't fit in my bento box unless they're cut in half. While I'm assembling one, I soak another wrap in the water. My kids love taking these for lunch as well!
As for the dipping sauce, well, get ready for some sweet and savory goodness!
Thai Nut Sauce:
1 cup almonds
1/2 cup olive oil
1/2 cup soy sauce or tamari
1/2 cup agave nectar
1-2 cloves of garlic (or more if you really like garlic)
Throw it all into a blender and whiz it up until it's nice and smooth. It makes a lot, which is a good thing!
Enjoy!
Thursday, September 5, 2013
2014 Toyota Tundra Preview
Like a Kid in a Candy Store
Bear with me, here. Do you remember when Charlie Bucket went on the tour of Willy Wonka’s amazing chocolate factory? Remember all the choices and options there were? Lickable, flavored wall paper. Everlasting Gobstoppers. Chewing gum that packed a 3-course meal into one delicious treat. Then, at the end, there was the great glass elevator with hundreds of buttons that took you not just up and down, but sideways, and frontways, and diagonal, too.
I think Tundra’s designers took a cue from Mr. Wonka himself. Tundra is now offered in five trim levels, with a slew of options available within each grade. Flavored wallpaper (darn it) is not one of them. What is offered, however, is the opportunity for every Tundra consumer to get exactly the pick-up truck they need. With three engine choices, various cab configurations, and a host of bells and whistles, the American-built 2014 Tundra should give Ford, Chevy, and Ram a run for their money.
I had a chance to take the 2014 Tundra for spin through Grand Teton National Park in Jackson Hole, Wyoming. I spent time behind the wheel of an SR5, a Limited, and a 1794 Edition Tundra.
Toyota engineers listened to their customers when it came to designing this latest iteration of the 1/2-ton pick-up. Owners wanted a less bubble-like look and designers answered with stronger horizontal lines, a more chiseled body, and a front fascia that looks like it means business. The hitch connector was moved next to the license plate light, where it is both easier to see and access. The front bumper is now a 3-piece modular outfit, which should help out the guys who are always pulling something out of both the proverbial and literal ditch.
Inside, soft-touch materials give the SR and SR5 versions a more refined feel. Leather options deck out the interiors of the Limited, Platinum, and 1794 Edition. All trucks I tested were double cabs, which offered spaciousness and comfort; as well as plenty of room to stretch out in back. One innovative feature is the “tip-up” back seat, which sounds exactly like it is. When you need to secure something within the interior of the truck, the back seats tip up and out of the way, meaning lower load height and increased cargo capacity.
The Tundra handled beautifully on hills, highways, and off road. The cabin remained quiet. It accelerated with little effort. Depending on which model you choose, the Tundra is capable of towing up to 10,500 pounds. I towed a 5000-pound trailer, and while it was a little slow to reach cruising speed, it did so easily and smoothly. It was absolutely no effort to steer, maneuver, or turn -- even on unpaved surfaces.
The 1794 Edition is definitely the star of the line-up, though not any more or less capable than any of the other trim levels. Its name pays homage to the founding year of the ranch that the San Antonio Toyota Plant now calls home. With special badging, 20-inch wheels, and Lexus-quality leather, the 1794 Edition is a workhorse in show horse clothing. Toyota designers wanted the 1794 to reflect the truly American truck it is. The Tundra is designed, engineered, and built entirely in the U.S. and is mostly made from American-made components.
With so many choices, features, and options, when it comes to the Tundra, you might just find yourself feeling like a kid in a candy store. Pricing ranges from $25,920 for SR to $47,320 for Platinum and 1794 Editions.
Monday, September 2, 2013
2014 Toyota 4Runner
Happy Labor Day, everybody!
Have I mentioned that I like cars? Have I also mentioned that I sometimes get to write about cars? When you're taking care of house-related projects, you often find yourself in need of a reliable car to haul your project materials. Last week, I got to go to Jackson Hole, Wyoming to check out the new Toyota 4Runner. Here's my take:
2014 Toyota 4Runner Preview
The Can-Do SUV
I can’t believe I’m typing this, but the mid-size SUV segment is shrinking. I’m talking about the solid, hard-core, high-riding, go-anywhere SUV. I mean, what happened? Wasn’t the mid-size SUV the bread and butter of the SUV world? Sure, they’re still out there, but in name only. Most of them have been transformed into unitized crossovers, great for getting to soccer practice, found in suburbanite garages all across America. But what about the rock climbers? The mud boggers? The mountain men (and women)? In other words, what’s left for the real adventurers?
Though the segment may be shrinking, the new Toyota 4Runner is here to answer the call. I got a little taste test recently, during a whirl wind trip to Jackson Hole, Wyoming. Set against the backdrop of the Grand Tetons, I was given a small peek at the can-do 2014 Runner.
But first, a little history: the 4Runner first rolled off the assembly line in 1984. Since then, nearly two million units of this iconic SUV have been sold. Even more astounding, of those nearly two million, a whopping 75% of them are still on the road today. To say the 4Runner is the can-do SUV is just the tip of iceberg.
I started out with an on-road test, driving a 4Runner Limited 4X2 in and around Grand Teton National Park. The first thing you notice when sitting behind the wheel is visibility. With a nearly vertical windshield and generously proportioned windows all around, the 4Runner offers that rare combination of ride height and nearly unobstructed views all around. The ride is solid and the cabin is quiet, with just the right amount of road feedback coming back at you through the easy-to-hold steering wheel. Handling feels good, though on gravel roads, the steering seems to loosen up somewhat. The 4.0-liter engine remains unchanged and offers plenty of get-up-go when you need/want it. The 4Runner does come equipped with a new trailer sway control, which used various sensors to detect and therefore suppress trailer sway -- which is a definite plus when towing high-profile trailers in windy conditions.
Later, I was taken for a ride in a Trail edition 4X4 at the famous Diamond Cross Ranch. If the 4Runner is the can-do SUV, the Trail is the can-do SUV that takes names. We came in at angles steep enough to make your mother swoon -- especially with 2-3 wheels in the air. We pulled up muddy climbs. We rocked our way down jagged crags. Multi Terrain Select, a control knob located over the rearview mirror, allows the driver to input the type of terrain you are approaching. From slippery, muddy surfaces to rocks, dial the knob to select, and the 4Runner does the rest. There are also selectors for crawl control, vehicle skid control, and traction control. And should you decide you need to lock your rear differential, there’s a button for that, too. Needless to say, it would be mighty difficult to get this car stuck.
4Runner’s new look is much more rugged, much more chiseled, with stronger, better defined lines. The 4Runner is offered in three design grades: SR5, Trail, and Limited. Within each grade is offered an array of options for both inside and out. Of note, my Limited 4X2 came equipped with automatic running boards, a feature to which I have always been partial.
Inside, soft-touch materials abound, giving it a rugged, yet refined feel. Also new this year is the Entune entertainment system, featuring all the connectivity you could imagine, with apps like iHeartRadio and Pandora. However, I think the 4Runner itself provides plenty of entertainment without the electronic pomp.
So yes, my first impression of the 2014 Toyota 4Runner is a good one. It’s the last body-on-frame design left in the segment. It looks tough, it’s strong, and it will go anywhere. It’s the can-do SUV.
For more information, visit www.car-data.com.
Wednesday, August 21, 2013
Back to School
If you're like me, you're probably asking me yourself, "Where did the summer go?" I took a little time off from house projects and blogging to do some other things. Like turning 40. And going to the movies. And submitting my novel to literary agents. And going on T.V. And going in search of the best shaved ice in Utah!
My kids went back to school yesterday, so I thought I'd share a little post on how we do lunch. My kids don't especially care for school lunch, and I would much rather send them off with something healthier (and cheaper) besides.
Have you noticed all the Bento-style lunches on Pinterest? I like them for two reasons:
1. They save us on all those plastic baggies!
2. Bento boxes allow us to get creative with what to eat for lunch - beyond a peanut butter and jelly sandwich.
I found a couple of divided-compartment containers at Walmart last year, and while it has taken some time, my kids have gotten used to using them and are even having some fun coming up with things to eat for lunch.
Here's what my 9th grader took today:
She took some diced mango, pretzel sticks, and a chicken-bacon salad with grape tomatoes. When I was cooking dinner the other night, I grilled some extra chicken on my trusty little George Foreman grill, chopped it up, and stashed it in the fridge for lunch. This is actually the second day in a row she's asked for that salad!
And here's what my 5th grader took to school:
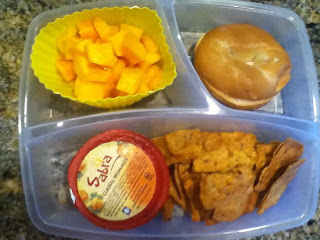
He took some diced mango, a mini multi-grain bagel with strawberry cream cheese spread, and hummus with baked pita chips. I've never seen a kid who loves hummus more than he does! Just FYI, Costco sells a box of 16 2-oz single serve packs for the same price as the 32-oz tub that never gets finished before getting all icky. Score!
I think the possibilities for bento-style lunches are pretty much unlimited. If you've got bento lunch ideas of your own, I'd love to hear them!
Thursday, July 18, 2013
How To Paint a Door
Between the first and second floors of House No. 3, I have painted 12 doors so far! Pantry doors, laundry room doors, bedroom doors...doors, doors, doors!
With all of those doors, I have developed a technique that works for me. Some people like to remove the doors from the hinges, drive nails into the tops and bottoms, and use saw horses in the garage to paint them. I don't have that kind of time, patience, or space, so I leave the doors hanging right where they are. I usually end up painting 2 doors at a time. I paint the first coat on one door and then, while it's drying, I paint the first coat on the second door. Then, while that's drying, I put a second coat on the first door. You get the idea.
First, gather your supplies: you'll need a good brush (I can't stress the importance of a good-quality brush)! You'll also need tape, a smooth-surface roller, a paint tray, painter's plastic (to protect the floor) and of course, paint! I used semi-gloss.
My husband had already painted the trim, so then it was my turn to tackle the doors. Tape off the hinges and knobs.
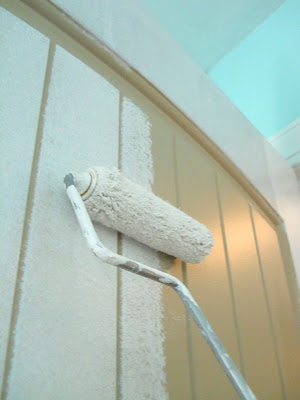
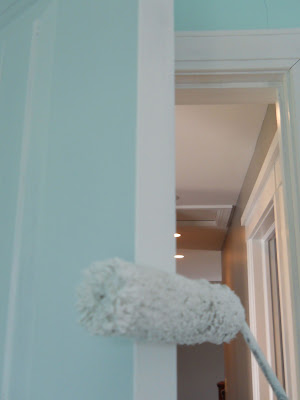
I like to start out by painting the sides, rolling the paint on straight up and down.
Then I cover the horizontal parts.
Next, I move on to the middle of the door.
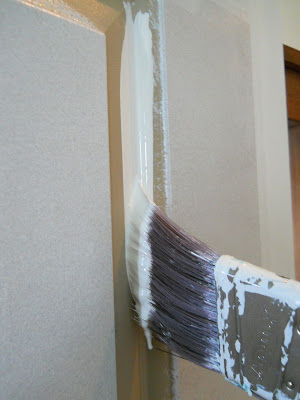
Take your brush and get into the grooves! I've found that if you really load it up with paint (not quite dripping -- but almost) you can get a really smooth look. Pull the brush straight down in one long stroke. If you run out of paint before you run out of door, reload and start about an inch above where you ran out. When I do it this way, I avoid brush/bristle marks in the paint.
Don't forget the sides! Keep a damp cloth handy to wipe off the hardware if you get paint on it -- and I always do! Once the first coat dries, go back and add a second coat.
I learned a neat little trick from the guys at the paint store. If you're done painting for the time being, simply wrap your roller and paint brush in plastic wrap. This is a great little time saver! It always takes me a good 10 minutes to wash everything out, so by doing this, I'm saving time and paint. When I unwrap them, they're good to go again. I've left them like this for as long as 24 hours and didn't have a problem.
Once you're all done, stand back and admire your handiwork!
The first door I did took me a few hours -- I'm a bit of perfectionist when it comes to painting. But once I got my own little system worked out, I cut that time significantly! Waiting for the coats to dry is the most time-consuming part, which is why I paint two doors at a time.
There are lots of ways and techniques on how to paint doors out there, but I hope you'll find this one somewhat useful! Let me know how it works out for you!
With all of those doors, I have developed a technique that works for me. Some people like to remove the doors from the hinges, drive nails into the tops and bottoms, and use saw horses in the garage to paint them. I don't have that kind of time, patience, or space, so I leave the doors hanging right where they are. I usually end up painting 2 doors at a time. I paint the first coat on one door and then, while it's drying, I paint the first coat on the second door. Then, while that's drying, I put a second coat on the first door. You get the idea.
First, gather your supplies: you'll need a good brush (I can't stress the importance of a good-quality brush)! You'll also need tape, a smooth-surface roller, a paint tray, painter's plastic (to protect the floor) and of course, paint! I used semi-gloss.
My husband had already painted the trim, so then it was my turn to tackle the doors. Tape off the hinges and knobs.
Then I cover the horizontal parts.
Next, I move on to the middle of the door.
Take your brush and get into the grooves! I've found that if you really load it up with paint (not quite dripping -- but almost) you can get a really smooth look. Pull the brush straight down in one long stroke. If you run out of paint before you run out of door, reload and start about an inch above where you ran out. When I do it this way, I avoid brush/bristle marks in the paint.
Don't forget the sides! Keep a damp cloth handy to wipe off the hardware if you get paint on it -- and I always do! Once the first coat dries, go back and add a second coat.
I learned a neat little trick from the guys at the paint store. If you're done painting for the time being, simply wrap your roller and paint brush in plastic wrap. This is a great little time saver! It always takes me a good 10 minutes to wash everything out, so by doing this, I'm saving time and paint. When I unwrap them, they're good to go again. I've left them like this for as long as 24 hours and didn't have a problem.
Once you're all done, stand back and admire your handiwork!
The first door I did took me a few hours -- I'm a bit of perfectionist when it comes to painting. But once I got my own little system worked out, I cut that time significantly! Waiting for the coats to dry is the most time-consuming part, which is why I paint two doors at a time.
There are lots of ways and techniques on how to paint doors out there, but I hope you'll find this one somewhat useful! Let me know how it works out for you!
Wednesday, July 10, 2013
Homemade Salsa
One of my favorite summertime (or anytime) snacks is chips and salsa. I especially love homemade salsa made with fresh tomatoes and cilantro! I'm sure there are as many versions of homemade salsa out there as there are fireworks for the Fourth of July. This is one I've made up over the years. It's really easy and so refreshing! By the way, I like chopping up everything by hand. I know you can make quicker work of it by using a food processor, but I prefer the way it all turns out hand-chopped.
First, dice up 3-4 fresh tomatoes.
Then, add in 1/2 of a small onion, diced. If they're available, the Vidalia sweet onions are the best!
Squeeze in the juice of one lime.
Add in some salt and garlic powder to taste.
Chop up a bunch of cilantro. Chop up a green chile (I forgot to snap a picture of that part).
Stir it up and enjoy!
Monday, July 8, 2013
Pinterest Monday: DIY Welcome Sign
Hi Everybody! I hope your Fourth was as fun as mine! I got to see my daughter perform in The Music Man, we spent time with friends and family, and we ate lots of good food! The highlight for me was celebrating our first Fourth at House No. 3! Is that a mouthful or what? Our back patio offers the perfect view for all the fireworks displays in the valley where we live, so the hubby and I pulled up some deck chairs, cuddled up under a quilt and watched the fireworks with the kids. Maybe next year I'll remember to snap a picture, but this year I was too busy enjoying the moment!
SO...It's another Pinterest Monday, and I thought I'd share something I made a while ago. I was inspired by this pin right here:
It's an easy project, as the instructions are simple to follow, and don't require a lot of tools beyond a saw and a drill. Here is what I did:

I was so pleased with the way it turned out, I made one for my mother-in-law for her birthday last year. So there it is. I hope this inspires you to take a project and make it your own!
Remember, just steal like an artist!
SO...It's another Pinterest Monday, and I thought I'd share something I made a while ago. I was inspired by this pin right here:
It's an easy project, as the instructions are simple to follow, and don't require a lot of tools beyond a saw and a drill. Here is what I did:
Yeah, I steal like an artist. I'm much better at taking an idea and making it my own, as opposed to coming up with an original idea. If you're skeptical of that philosophy, just think of all the Hollywood movie remakes out there!
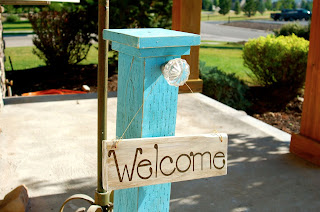
I'm really in love with all things turquoise lately. I like how it stands out, yet seems to go with everything! I added a crystal doorknob (purchased at Home Depot) instead of a hook, just to give it a little sparkle.

Above, you can see I spent some time distressing the paint with a little sandpaper. I slapped some green over the turquoise and then sanded it off to give it a really aged look. The fence post I used came with all those little marks already made -- I think they really add some character!
Monday, July 1, 2013
A Patriotic Pinterest Monday
Hello, Everybody! If I haven't told you before, summertime is my absolute favorite! Sunshine, watermelon, and flip-flops -- what's not to love? With the Fourth of July coming up this week, I thought I'd share a pin in honor of the holiday.
And here is what it looks like after I printed it:
I printed them on regular, plain white paper and stuck them in frames from the dollar store. How nice of Martta over at HMH designs to offer these cute printables for FREE! What a quick, easy, and affordable way to add a little patriotic pride to your house this week! I will definitely have these on display in House No. 3 this week! Happy Independence Day!
Friday, June 28, 2013
Gallery Wall How-To
So I'm a big fan of photography. My sister is an excellent photographer and I try to do what she does. In this case, I let her take all the pictures, and I hung them on my wall. I love the idea of a gallery wall in the home -- especially in the family room -- where we spend a lot of our time together.
I don't claim that my way to do a gallery is perfect or even the best; but it works for me. Here's what I do:
First, I lay out all my frames on the floor and arrange them the way I want them to go on the wall. Then, I cover them with wax paper. Why the wax paper? You'll see in minute.
Next, I tape the wax paper together. Wax paper and Scotch tape don't always play nice together, but it was all I had at the time.
Then, I lay out the frames on top of the wax paper. I moved into the entry way because I needed a hard surface and my counter top wasn't big enough. I take a Sharpie and mark where the nail holes go. I also trace around the frames to give me a reference point later.
Because I have freshly painted walls and it pains me to make nail holes in those pretty walls, I use a lot of these Command Strip Picture Hangers. They are a lifesaver, wall saver, and sanity saver all in one. They make hanging pictures super easy. However, there are some things that I just feel need a nail. Like the heavier frames and the canvas.
Okay, now for the next step. I position the wax paper on the wall where I want my photo gallery to hang, and secure it with tape. Then, I turn off my ceiling fan because, well, the wax paper just wants to dance. Idrive gently tap a few nails where I've made marks and then make pencil marks for the Command Strips. Then I rip the wax paper down.
After that, I hang my pictures, stand back, and admire my handiwork (after turning the ceiling fan back on, of course)!
Don't you just love that little sign? My father-in-law bought it for me, and I was so honored, I just HAD to hang it up with my gallery!
I'm planning to hang at least 1 or 2 more gallery walls in House No. 3, so I will post when I do!
I don't claim that my way to do a gallery is perfect or even the best; but it works for me. Here's what I do:
First, I lay out all my frames on the floor and arrange them the way I want them to go on the wall. Then, I cover them with wax paper. Why the wax paper? You'll see in minute.
Next, I tape the wax paper together. Wax paper and Scotch tape don't always play nice together, but it was all I had at the time.
Then, I lay out the frames on top of the wax paper. I moved into the entry way because I needed a hard surface and my counter top wasn't big enough. I take a Sharpie and mark where the nail holes go. I also trace around the frames to give me a reference point later.
Because I have freshly painted walls and it pains me to make nail holes in those pretty walls, I use a lot of these Command Strip Picture Hangers. They are a lifesaver, wall saver, and sanity saver all in one. They make hanging pictures super easy. However, there are some things that I just feel need a nail. Like the heavier frames and the canvas.
Okay, now for the next step. I position the wax paper on the wall where I want my photo gallery to hang, and secure it with tape. Then, I turn off my ceiling fan because, well, the wax paper just wants to dance. I
After that, I hang my pictures, stand back, and admire my handiwork (after turning the ceiling fan back on, of course)!
Don't you just love that little sign? My father-in-law bought it for me, and I was so honored, I just HAD to hang it up with my gallery!
I'm planning to hang at least 1 or 2 more gallery walls in House No. 3, so I will post when I do!
Subscribe to:
Comments (Atom)


